
Fundamentals of Composition
Negative and Positive Space
So what is positive and negative space?
 From my understanding and to put it simple, positive space is best described as the areas in a work of art that are the subjects or areas of interest. The negative space is area around the subject or areas of interest.
So the positive space for this image is the The drummer, drums, symbols.
This can be really effective for illusionary, subliminal stencils and silhouettes imagery.
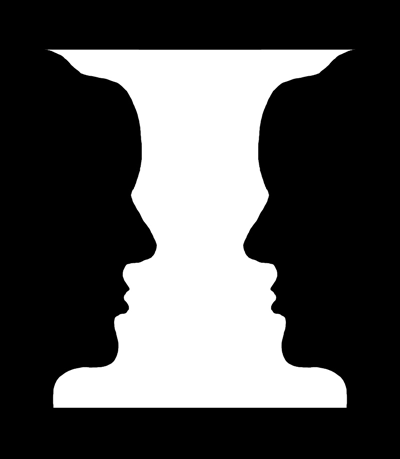
For example, do you see faces or the vase? If you area seeing the vase, then you're seeing the white area as the positive space. The black areas become the negative space. If you are seeing faces, then you are seeing the black area as the positive space and the white area as the negative space.
Positive and negative space work together
so positive doesn't necessarily mean good and negative doesn't necessarily mean bad space.
So if you could see the vase this time and didn't see the faces.

This time when you look at this image you can see the vase, then you are seeing the black areas as the positive space and the white areas as the negative space.
If you are seeing the faces, then your seeing the white space as the positive space and the black areas as the negative
Positive and negative work together for compositions of art.

Here is an ' example of equal balance of positive and negative space'
This is a relative a good composition that as a balance of positive and negative space. By having your composition either more positive, more negative or balance like the example above, it's just different ways to approach it, So by understanding the relationships and thinking about how you can use those it accordingly like limiting one or another to create different variation of space, you can create successful compositions and art work!
"Just like an blank piece of paper that there is nothing negative or positive a bout it"
Colour and Lighting
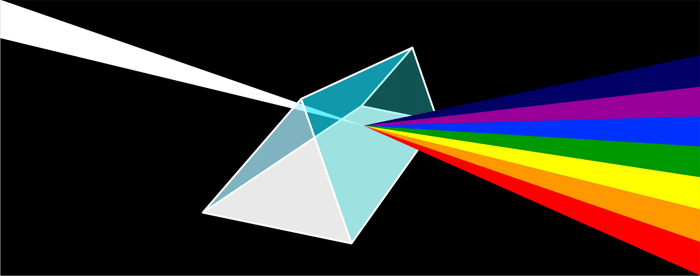 |
| Sir Isaac Newton (1643-1727) The refraction of light through a glass prism |
So from this simple experiment that demonstrates the colour comes from light - in fact, that colour is light.
So you could say that scientists investigate the properties of 'colour theory' whereas artist explore its visual effects.
which nice to see both have important roles of one another for which then when art and science intertwine together, just as if the left and right hemisphere of the brain does, the wholesomeness where it lies for great evolution of discovery.
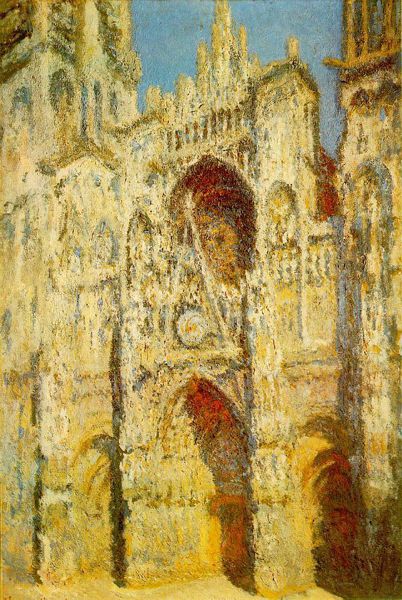 |
| Claude Monet (1840-1926) 'Rouen Cathedral in Full Sunlight |
For an artist example, the movement 'impressionism' was an new style of painting that emerged in France at the end of the 19th century. The impressionist artist were interested in trying to capture the changing effects of light on the landscape by using a more exact analysis of tone and colour. Their ideas were inspired by Eugene Chevreul's scientific research into colour theory.
The impressionist artist abandoned the old idea that the shadow of an object was made up from the colour of the object with some brown or black added. Instead, they enlivened their canvases with the new idea that the shadow of any colour colour could be mixed from pure 'hues' and broken up with it's 'opposites colour'. For example, the shadow on a yellow surface could have some stroks of lilac painted into it to increase its vitality.
Depth/ Layers
Depth and Layers, I typically understand them more due to the digital applications, such programs as Photoshop. Making layers can be used for many techniques, for applying extra paint on top of paint, that your building up the tone/ colour to create that depth, making savestate or changes/ graphical and artistic effects, using 'the layers options' such as multiply and so on, for this can open an massive exploration for artist using digital software for their art.
The great benefit a bout digital art is, that in the software such as Photoshop, you can have your work flow organise by having your layers of foreground, midground and background, which can make things easier for the artist and if you mess up, you can just delete the layer and start again, instead of ruining your painting on work only on one layer, that you have to go back over, correcting.
However all of this can be applied to traditional art, but can be a lot harder and more time consuming to try these techniques, but I came across an great example of using 'layering' not in painting, but sectioning elements to create that visual depth of the fore, mid and background.

Here an example of 'overlapping to create depth. The layers of a landscape'.
Which you can see this artist from his tutorial has drawn our specific elements the composition for then he can piece them together, layer them accordingly to create the illusion of depth.


I do question that could it of been easier for the artist to draw this all out in the first place? Or was it more creative and easier for the artist to work out by creating individual elements then piece it together?
What I can understand from this is, it could lead to extra work and you might loose the flow of drawing, out your composition as a whole on your paper, however you could get stuck and overwhelmed when drawing, to draw the whole scene and to get it right, so you can problem solve by applying this technique of drawing them on separate layers and then you can build them together afterwards thus for an bonus you could even make more exploration of making different combinations of the composition.
The Golden Ratio
The golden ratio an mathematical formula for an aesthetically pleasing composition, just like the rules of thirds, odds and so on. It's the reason the rules of thirds works, but there are many photographs, drawing, paintings that could not follow the rules of thirds, but the golden ratio accounts for that.
So the rules of thirds is simply one manifestation of the golden ratio. The golden ratio is , so to speak, the golden rule of photography, but can be transferable in illustrations.
Another application of this is the
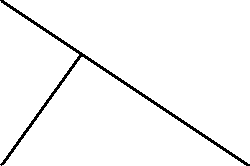
The Golden Triangle
The Golden Triangle
To use this as an compositional guide, 'visualise lines' going through the frame so that they form equi-angular triangles, that is, triangles with the same angles in them, different in sizes but the same shape.
The examples here shows what this looks like, but you can add more and more lines conceptually if you wish, as long as the angles always remain the same.
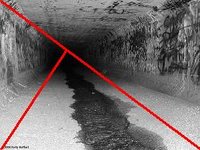


So the following of images have all nice composition, but they do not appear to be following the rules of thirds. The golden triangle is a much better way to conceptualise them.
So the area just inside the point of the smallest triangle is sometimes called a cradle. This is often seen as a good place in the frame to position the elements of your picture. Example of this windmill photo

The final compositional tool base on the golden ration is called
The Golden Spiral
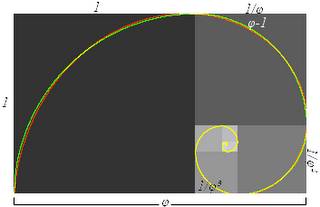
This is probably the most pleasing of all these tricks, if you used them expertly. It's also another way to study photos that ultilize the golden triangle and it's always another tool that you can use. The more tools in your toolbox, the more situations you can deal with effectively.
The Rules of third
Rules of third is an very well known rule, such as one of the first I was introduce to, but really only stumbled across it since my University course and it has benefit myself when producing an painting or setting up images,such an very powerful compositional technique for making photo, drawing, paintings more interesting and dynamic.
Though you don't need to worry a bout perfectly aligning everything with the thirds of an image, it' just an rough guideline, usually it's important that your main subject or region isn't always in the direct middle of the photography, such as for landscapes this is usually means having the horizon align with the upper or lower third of the image and for subjects, this usually means placing them either side of the photo. This can make landscape compositions much more dynamic and gives the subject a sense of direction.
Breaking the rules of third?
It is always fun and daring to break rules, yet free-spirited and creative artist just like myself, can feel a bit cramped and cliosophic with 'too many rules to follow'. However all rules are bound to be broken and the rules of third is no exception.
So the free-spirit artist gets a sense of relief, deep breaths in and out! Only that if it's right and for an good cause.
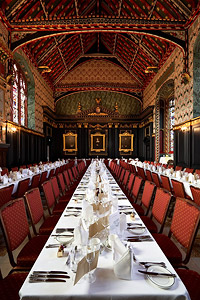
The ideal of the rules of third is a bout not being very central, like an subject in the center. But what if there is symmetry to emphasize? The picture on the right does this, or there could be other situations where it might be better to ignore the rules of thirds than to use it. You might want to make your subject look more confronting. Alternatively, you might want to knock things out for balance.
So again important to take a step back and ask yourself;
what is special a bout this subject?
what do I want to emphasize?
what mood do I want to convey?
If the rules of third helps you achieve any of this, then use it. If not then don't let it get in the way of your composition, because there are many others that might do the job better anyway :)
Rules of Odds?

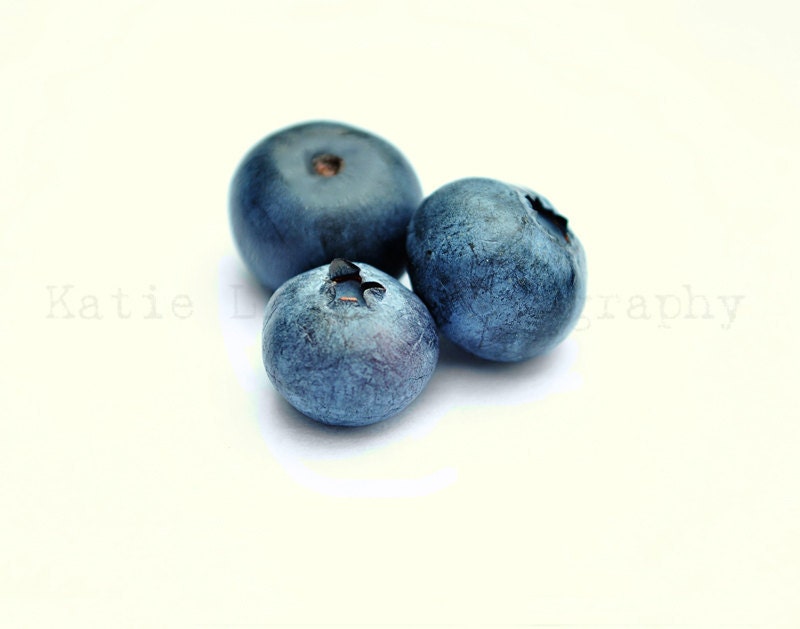
So an good thing I realised is that when to decide an composition, is that to be mindful of how many elements or items there will be in it, that one of the simplest way to make an composition more dynamic is to have an odd number in the composition, for example three, five, seven, rather then even numbers like two, four, six.
Our brain function well understanding and seeing patterns in things, so having an odd number in an composition means your eye and brain can't pair them up or group them easily. There's some how always one thing left over, which keeps your eye moving across the composition.

So with an even number of elements such as in the basic composition of this example of the left. Your eye can instinctively pairs up the trees, whether it's two left and two right or two top and two bottom.
Whereas the lower two compositions, each with an odd number of elements, are more dynamic in terms of composition, because your brain can't pair up the elements.
It's great to ask the question, why do we pair things up naturally? Perhaps, it's because our body is designed in pairs: two eyes, ears, arms, hands, and so on.
The list can go on and on, too many to research / understand at once, but I have enjoyed this blog entry from questioning my own knowledge and refreshing my self with information and then expanding into other areas of research that has been an valid search and have improved my own awareness, that I can apply these techniques into practise and improve my own artwork and how I visually see the world!
Just to make an short list, so I don't forget and continue my search of other composition rules and even for the reader here, to know there are more to be aware and visualise from.
- Rules of space
- Simplifications
- Range and limited focus
- Balancing elements
- Leading lines
- Symmetry and Patterns
- Background
- Framing
- Cropping
- Experimentation
No comments:
Post a Comment